Saturday, April 7, 2012

Egyptology for the Barbie generation?

At the moment I have three small art students on a Sunday morning who come to the studio to do various things. When I was talking to their parents about how I teach and what I'd teach I spoke about taking a holistic approach to a subject, so if, for example, we were looking at horses we'd look at paintings and statues of horses through the history of art, we'd look at the anatomy of horses, and we'd make models in clay as well as drawings - which is exactly what we did, since horses were the kids' first subject choice.

Then by popular demand we went to work on Ancient Egypt, and boy have we had fun! We've painted pyramids, looked at what Ancient Egyptians might have had in their houses, read books on the excavation of Tutankamun's tomb and tackled the exciting world of mummification! And so it came to pass that we needed a volunteer to become a mummy (or three), and the concensus was that Barbie dolls would be perfect thing! Little Bird had her own that she wanted to mummify, and had kindly donated her others to one of the students, which left one mum to go find a lonely Barbie doll at the Op Shop.


There were several varieties of wrapping, from crepe bandages to torn sheets (I ran out of bandages, or at least, wished to preserve some for their original purpose in my First Aid box!). It turned out that wrapping the three-dimensional form wasn't as easy as we thought, so little 5 1/2 year old hands had a little bit of help.


Some of us got very excited about grave goods and there was a lot of discussion about what the modern day mummy would need in their tomb to take to the afterlife. Suggestions included jewellry, something to sit on, and flip-flops ('thongs' for the Australian contingent). Little Bird spent ages modelling a precisely fitted mask and painting it to look like one she'd seen in a book!


And finally the Barbies were immured in their sarcophagi (we had a look at what that word means, too, much to everyone's horrified delight!) which we'd made the week before. A job well done.

Now all I need to do is think about next term's first project...

Wednesday, March 21, 2012

Knitting in the round

Say hello to Lilly Rabbit! She isn't the most photogenic rabbit on the block (or should I say, in the warren?), mainly because I took bad photos in dim light at night, but she's sweet. And on a more practical note, she was an exercise in learning to knit in the round. I think she looks like a mini-version of me when I was a kid! The pearl buttons I used for the eyes have a rim which makes them look a bit like glasses, and she looks earnest, slightly nervous and gawky. Me all over.


She's knitted entirely on four double-ended size 3 needles in a 4-ply cotton mix I had left over from knitting darling daughter a rabbit hat when she was about 2 years old! I started off at the centre of the base with six stitches and cast on every two stitches, every other row. Then I came up the sides, decreased around the top until I had about 16 stitches left, and then I went all fiddly and managed to knit 6 stitches at the base of each ear in the round all the way up and all the way down! I must confess this isn't an original pattern: I adapted it from The Purl Bee's Big Cuddly Bunny pattern, and sort of made it up as I went along. The Purl Bee has LOTS of lovely patterns in knitting, sewing and crochet, if you're interested.

Why? You may well ask! Apart from thinking that a cute bunny would be a good gift inside one of those lovely German paper eggs that I hoard for Easter celebrations, I also thought it would be a great exercise in learning to knit in the round because my secret ambition is to conquer knitting socks! I have Swiss friends here with mothers who send them hand-knitted socks in gorgeous yarns, and as I don't have a mother any more to knit them for me (or, more likely, to ask me why I want knitted socks and tell me she's got better things to do!) I realised I'd have to do it myself. And I reckon if I can conquer 4-needle knitting in 4-ply wool on small needles I can conquer turning a heel, especially with the help of a book I've found that tries hard to explain how sock patterns work in plain English. Wish me luck! If I succeed, the results will be posted here.

Friday, February 3, 2012

Fabric


New fabric from Bloom Fabrics! I was looking for needlecord to do a dressmaking project with Little Bird (we're making a skirt! Very exciting), and stumbled across Kerrie's website. She stocks a number of beautiful European and Japanese fabrics as well as the German Farbenmix ribbons. Well, as you can see, I was completely seduced and spent a reasonable sum on several short lengths for making bookcloth as well as the corduroy for Little Bird's skirt, some Farbenmix ribbon, and a little something for making summer P-Js.

From the top: two photographs of the lovely fabric for making bookcloth (would also be great for making bags and accessories), a photo of the lovely pink/red printed needlecord which will make a fabulous short kick-pleated skirt, and a photo of the cotton bird print that's going to make the P-Js.


Lucky for me, Kerrie's moving her business up this way soon so I'll get to meet her and see her showroom full of lovely material!

Thursday, January 26, 2012

Hi, it's Little Bird again! I made a pencil case - isn't it cool? It is for all my Lira pencils; handy but cute.


(Rhubarb here!) This is our first attempt at a bag, and we got the pattern from the latest Spotlight quarterly magazine. I had to read and re-read the pattern instructions because I didn't "get" it at first! You make up each side, then quilt and top stitch it, then sew in the zip along the top edge. Then you stitch the lining pieces along the same line of stitching for the zip, making a very neat closure. Then you stitch together the quilted pieces (right sides together), including a handle along the seam line, and mitre the corners. Then you stitch the lining pieces together - leaving a gap so you can turn it all the right way in - and mitre the corners. Finally you turn it all in, push the lining into the bag, hand stitch the mitred corners together through the gap and finally sew up the gap! Et voila. And because it's going to school we also stitched a name tag into the lining.


See ya!

Little Bird


Wednesday, January 25, 2012

Box making workshop

I enjoyed the company of my daughter and a friend's two girls the other day and we decided to make boxes. Darling daughter decided to make a case to hold the CDs she got for Christmas and her birthday; Amisha made a very swish bed for Fili, her toy elephant, complete with sleigh-bed sides and a lid, and Luana made a box to match the coptic-bound travel journal she made with me last year: the book is so full of tickets, notes and other ephemera that it doesn't properly close so this box is for the book and the collection!


Thursday, January 12, 2012

My Cat Bag

Hi everyone it's Little Bird again. I have made a Cat Bag!

Do you like it? It's easy and fun to make! In the pattern it was fleece but we used fluffy chocolate brown fabric. And I did almost everything on the sewing machine except the eyes, mouth and the ribbon. The stitch on the sewing machine was zig zag. And I used straight stitch for the mouth & ribbon.


Saturday, January 7, 2012

Owls and cushions!


Hello! Little Bird here - this is my first blog post. I made these last week from a great book I got for Christmas. The owl's name is Owlie. And the cushion I made for my room!

Monday, June 20, 2011

Music Bag


Darling daughter has been ferrying her music between piano lessons, violin lessons and choir in a succession of grotty plastic bags for ages, and they fall apart easily when pointy book corners poke through the plastic! We decided that action was necessary and a couple of weekends ago we spent a pleasant (if cold...) afternoon on the verandah felting this bag.


I bought an open-weave men's cotton shirt from the Op Shop to use as a base, cutting it into the front, back and handles and - bravely! - deciding NOT to stitch the cotton backing together before felting on the basis that the multiple layers of wool should be enough to hold it in one piece by the time I'd finished... This is typical me: I've not really done any nuno felting before, so I take a quick look at a book or two, assemble the materials and have a go, while vaguely trying to remember all the injunctions about how to lay out seems around a resist that I was taught a couple of years ago.

Anyway, with a bit of effort it seems to have worked! The "seams" are very strong (probably because they've got 4 layers of fleece them plus turn-overs holding the cotton backing together down the sides and along the bottom), the top edges are straight and the wool is properly felted. Daughter and I laid it all out together, which took an hour or so, and then she made the straps while I battled with the bag. We used the bubble-wrap and rolling pin method which saved some time. I then blanket-stitched the top edge in a contrasting colour, using the same embroidery thread to sew on the handles. And last weekend we finished it off by making the lining (complete with pen-holders and an internal pocket!) from some old sari fabric on the sewing machine. Darling daughter chose the lining material, helped to cut out the pattern, stipulated the placement of pockets etc., and sewed it on my machine, and then I hemmed it in place and reinforced where the handles are attached.

Saturday, April 9, 2011

Bookbinding with children

A weekend or so ago I fulfilled a promise I made to a friend's children who came to my January craft classes and wanted to do more book making. I said I'd have them over some time to learn how to make a coptic-bound sketchbook, so they came for a sleepover and we spent 7 absolutely intense hours making these books. The children were aged 8, 9 and 10 and they did brilliant work!


The oldest child is about to go to Switzerland for 6 months to spend time with her grandparents and attend a Swiss school, which will no doubt help her language skills and her self-confidence, so I suggested that we make wrap-around felt covers for the books because I can imagine her particular sketchbook getting damaged in her bag as she travels. We also made pockets in the books and used lots of different sorts of paper (squared paper, graph paper, pastel paper, plain paper and - fortuitously! - some pages taken from an old Swiss calendar showing beautiful photo-landscapes of mountain scenes). One of the girls has a bit of a thing about elephants and she chose a grey felt for her book cover: we used the excess felt to make two ears and a trunk, and I embroidered little eyes, a mouth and a tail on her cover so she has a really unique book!

Tuesday, February 1, 2011

Back to school

In this climate many kids go to school with their own drink bottle, ready to fill it up with water regularly to avoid dehydration. The best bottles (in my humble opinion!) are made of stainless steel which means that they don't leach nasty phthalates or degrade quickly or sit in landfill sites for a few hundred years! Unfortunately they aren't insulated and usually the necks aren't wide enough to fill with icecubes and you can't put them in the freezer... so what you need is an insulated bottle cover.

First find a wool blazer (I got mine in the second-hand store), then shrink it in a really hot wash to felt the fibres. Then cut both sleeves off and put one inside the other (right side out). Pull the wrist end of each sleeve together and stitch firmly to form a base, then over-sew one top edge over the other top edge to hide the raw edges and create the top of bottle cover. I slipped elastic into the top seam and tightened it a bit: enough to stop the cover slipping off the bottle in darling daughter's school bag but not enough to prevent the bottle being removed for washing. Then I embroidered her name on it.

Thursday, January 20, 2011

The end of the week

The children in my craft workshops have worked SOOOOOOO hard this week! I'm particularly impressed with their dedication to learning to knit. Here are the three baby owls who joined Wolly and Bob...


I'll be teaching again on Monday, Tuesday and Wednesday next week and spending the next couple of days plotting new craft activities to keep them amused! Have a great weekend.

Wednesday, January 19, 2011

Holiday Craft Workshops

This week I've been running children's craft workshops from my studio for the first time. It's Thursday morning so I've done three out of the five days on offer this week, and I'm exhausted but happy! So far six children have been with me this week and we've worked on papermaking, felting and - once our handmade paper was dry - book making.


A bucket of paper pulp to start! I soaked the shredded paper on Sunday night and on Monday morning the kids helped me blend it up into 'Paper Soup', and then sieve it into 'Paper Porridge'.


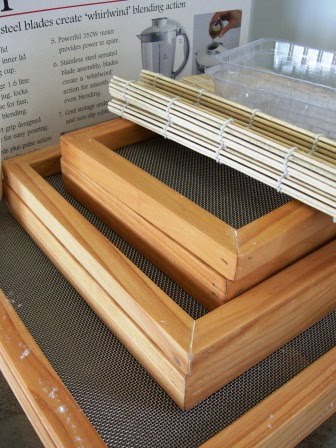
These are my moulds and deckles in A3, A4 and B5 sizes. The kids were great at sharing AND at cleaning up after themselves!


Ordinary cleaning cloths like these are used between each sheet of wet paper...


Here we are working outside on the verandah, couching fresh sheets of paper onto wet cloths and layering them up into piles on rectangles of 'felts' (or in this case, cheap carpet!)


We squeezed the paper piles between boards using clamps. The children had a lot of fun trying to tighten up the clamps!


We unpacked the clamps and used a rolling pin and a brayer to roll individual sheets of paper up onto the newly-cleaned windows! There were enough windows so that we could have one each plus a spare for the paper I made 'for everyone'


These are some of the books we made yesterday


We made simple pamphlet books, tried out Japanese Stab bindings, made a star book from folded coloured papers and a wagon book. The children were much more interested in the process of constructing different kinds of book than actually creating the contents, and were trying to squeeze as many different binding techniques out of me as possible!


It's been a really interesting learning experience for me, not least because my group this week has been equal numbers of boys and girls, with ages ranging from 5 to 12 so I've had to be flexible enough to teach across a range of ages and skills. Later on today some of the group will be back to learn how to knit. I'll let you know how I go...

Saturday, January 15, 2011

Meet Bob! Free knitting tutorial #2

I felt that Wolly needed a companion, so enter Bob! Bob is also simple to make.


I cast on 16 stitches and knitted a stripe pattern of 3 rows of garter stitch and 1 row of purl until I'd made 7 stripes. Then I swapped to stocking stitch for 6 rows.


Then I started decreasing at the beginning and end of each knit row until I had 10 stitches left; then I knitted another row and started increasing at the beginning and end of each knit row until I had 16 stitches again. Then I did another 6 rows of stocking stitch and started the 3 knit rows/1 purl row pattern until I'd matched the other side.


I made Bob up in exactly the same way as Wolly, knitting the same legs for him. I added a cute crest made from some spare 'ends' left over from sewing up Wolly, and although you can't see it, I made a little tail for him in the same way!


Darling daughter thinks they're really cute so once they've done their birdy duties as examples in my classes this week they'll probably find their way onto her bed, joining her other toys!

Thursday, January 13, 2011

Te-wit te-woo! Free knitted owl tutorial!

I was searching for some easy peasy knitting projects suitable for my children's craft classes which - yikes! - start on Monday, and after trawling the internet for a while I realised that I could easily make up my own. So I did. Meet Wolly the Owl (well he needed a name, didn't he? And I used to call owls 'wols' when I was little. So there).

You could adapt this very easily to make it smaller (fewer rows of knitting for very new knitters), and you could adjust yarn thickness and needle size to make it bigger or smaller. And who know what you could do with different yarns, stripes or whatever?


First, knit a rectangle. I cast on 20 stitches using 8-ply pure wool on 6mm needles. I knitted 18 rows in garter stitch, then 24 rows in stocking stitch and another 18 rows in garter stitch and then cast off knitwise.


The legs were a hoot (sorry): using a pair of 6mm double-ended needles I cast on 7 stitches in a contrasting colour and knitted 2 rows in garter stitch. I then cast off one stitch at the beginning of each of the next 4 rows to leave 3 stitches on the needle. I then knitted about 3"/7.5cm of i-cord which is very easy: simply knit the three stitches but don't turn the knitting around... just move the right hand needle to your left hand and, bringing the wool around the back, knit three stitches again, trying to pull the wool a bit tighter on the first stitch. Keep doing this and you make a really nifty cord! I've used it many times for ties, cords or knitted string and it's quick and easy.


I cut out small pieces of scrap felt for the eyes and beak and wings, pinning the wings on so that I would sew them in with the seam. Ditto with the legs. I sewed the eyes on using blanket stitch and just put a few stitches across the middle of the beak before I sewed up the side seams and the bottom seam.


The only 'complication' with sewing Wolly up was that although I turned him inside out to sew up most of the side seams, I went from bottom to top and for the last 1"/2cm I turned him back the right way in and sewed up his ears from the outside - this simply meant that the seam allowance sticks out rather than being turned in, which makes his ears stick out too.

I stuffed him with some polyester stuffing I had left over from another project but he could easily have been stuffed with fleece.


I really like his wonky character... and the fact that he took less than 2 hours to make - and I'm not a speedy knitter!